Table of Contents
Rule manager
Overview
Users can learn about the occurrence of significant events i.e. speeding, sudden fuel level drop, lost connection, etc., with the help of rulechains created in the Rule manager.

Creating a new rulechain
New rulechain can be created by clicking on the New rulechain button, located in the bottom left corner, below the list. The rulechain’s name is a compulsory information, filling the description* field is optional. The next steps are the selection of the covered device or devices, and to decide whether the rule deactivates after a successful run, or remains alert, continuously sending notifications when detecting a rule violation (on the left side of the picture below). Then the rulechain has to be assembled: the applicable rule types has to be selected, configured, sequenced, and saved. The figure below shows a simple rulechain which alarms in case of speeding, then deactivates.

Rule elements
A rulechain can be compiled in any order from the available rules chain elements, different orders of the same elements (subordination relationships) ends in different results. The available rule elements are the followings: battery rule, analogue and digital rule (harsh acceleration, cornering and brakeing, RPM, consumed fuel, fuelling, load space temperature, purpose of use, etc.), fuel theft, fence, speed, towing, lost connection, idling, and validity rule. The alarm can follow any rule element, at any point in the rulechain.

When creating a rulechain, the correct order of the rule elements guarantees the desired outcome. The figure below demonstrates the situation when the speeding will only trigger an alarm if it’s happening in a specified area, in a specified timeframe.

All rule element types operate based on the received coordinates average value, but five of them (fence, speed, battery, analog and digital) can operate based on elapsed time too.

Rule scheduler
The rule scheduler allows users to control the rulechains' operation. Four options are available: Always, Weekdays, Weekends and Custom.

Choosing Always, users have no setting options, the rule is in continuous effect.
Choosing Weekdays, Weekends or Custom, allow users to precisely schedule the rulachain's validity, multiple active/inactive periods can be set in the selected option.

Control buttons
The control buttons are located at the left side of the rulechain list. The first from the left opens the rule group, displaying the the devices covered by the rule.

The covered devices can be excluded/included from the rule individually with the ON/OFF button, or can be deleted permanently with the trash button.

The pencil icon edits the rulechain for modification, this window is identical with the one in the creation process. Here, any property can be modified, and any rule element can be deleted, new ones can be added.
The trash icon deletes the rulechain.
The last executable action is the rulechain’s deactivation/activation. If the user do not want to use the rulechain temporarily, it is enough to deactivate it, there’s no need to delete it. It can be reactivated anytime.
The notifications generated by the Rule manager are appearing in the Notifications menu, located in the top right corner, indicated by the bell icon.
Notifications
If a rule violation occurs after saving the rule chain, the system sends on-screen, audio, email and/or text message notifications, according to the notification's settings.
Important! Text message notification is only available if the subscriber package contains it.
The number of the rule violations is displayed on the bell icon, located in the top right corner.


The number appearing on the bell does not necessarily mean the number of rule violation events, as other notifications from the system end up here too.
Users can manage notificatons in this function. If the rulechain has earlier been created with the Deactivates after a successful run option, the deactivation ends when the notification is closed with the Close button ( ✔️ ), the rule will again be active. In case it has been created with the does not deactivate automatically after a successful run option, it evidently will continuously notify when detecting a rule violation, until the rule is manually deactivated.


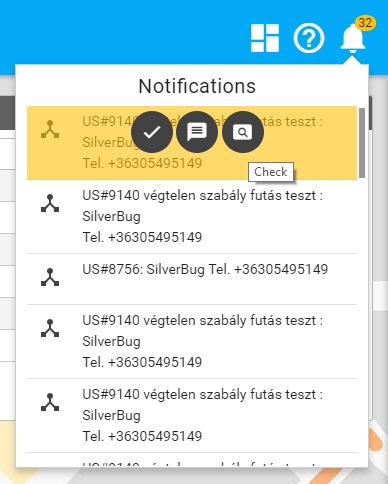
The Comment and close button ( 💬 ) allows users to add a comment when closing the notification.
The Check button ( 🔎 ) navigates into the Events menu, and opens the event’s details for inspection.
As in any other functions, the list’s content can be filtered with the Search button based on the rule’s name and the rule elements, the Columns button allows users to set the table’s desired appearance.